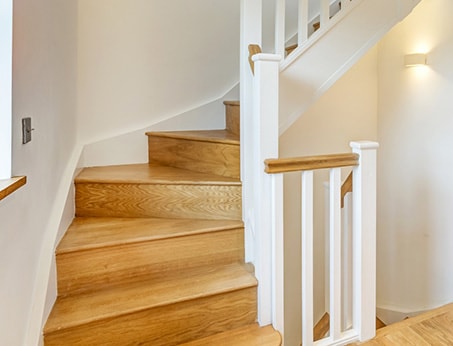
How to Fit Winder Turns
Top tips
Remember, everything is pre-cut and ready to be fixed
This is the number one rule when looking how to fit winder turns from StairBox. Posts and winders have been machined to suit. In other words, do not amend or trim anything if not specified below. If you feel the need to, you may have something in the wrong place - call us if you are unsure.
Clear some space
Give yourself lots of room, preferably so that you are able to manoeuvre the flight into place with the winder assembled. If this isn’t possible, build the turns in situ and work from the top down.
Fitting a top or bottom winder
When fitting a 3 tread winder to the top or bottom of your flight, follow the below steps.
Step 1
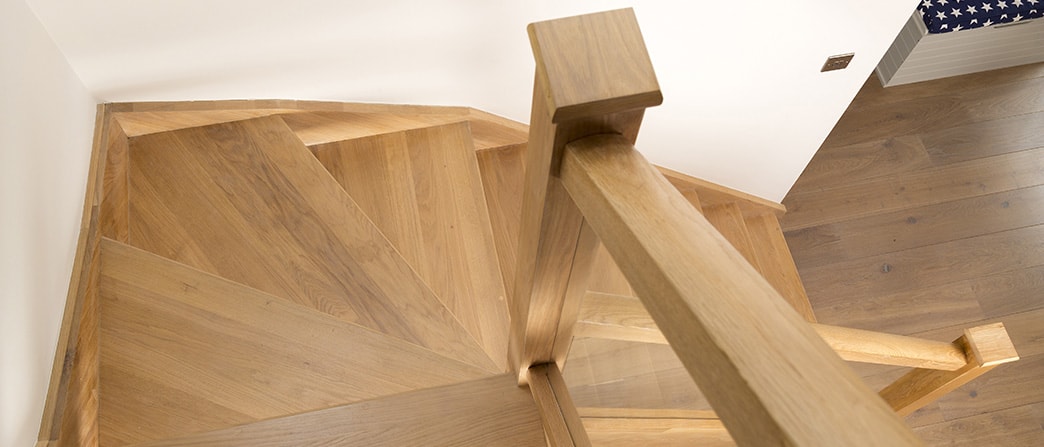
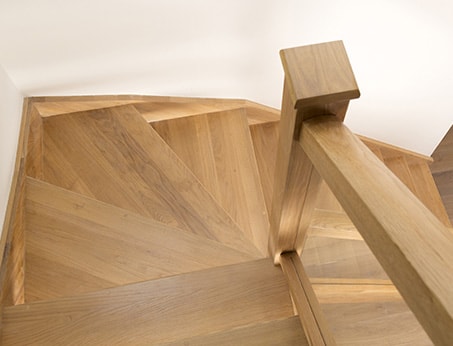
With your newel post fitted, locate the first winder step which follows on from the straight run of steps. Slide the winder fully into the wall stringer and newel post housing, the winder should fit perfectly in the housing with the back of the tread in line with the above riser trenching do not trim or modify any treads, these are cut accurately on a CNC machine, if it doesn't fit you may have the tread in the wrong place. If you have a problem, please call us.
Once you are happy the winder fits into its housing, apply a bead of glue to the newel post housing and to one of the larger (approx 300mm long) winder wedges and drive it into the trenching under the tread using a hammer, ensure the winder tread remains fully seated within the stringer housing (it may sit 1-2mm shy from the bottom of the newel post housing, you must ensure the newel post remains at 90° to the tread!). Next, use a screw to secure the newel post end of the winder tread, you will need to drill and pilot drill where appropriate.
Step 2
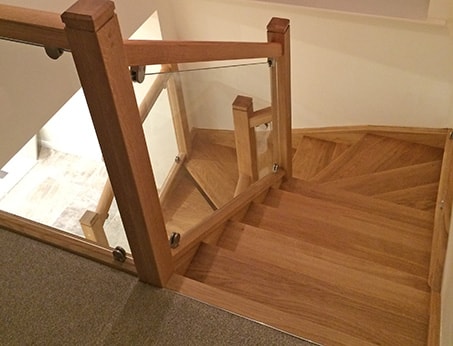
Slide the next winder (kite shaped) fully into the stringer (ensure you have the correct one as they will be different). Slot the loose stringer into place to ensure the corner tread fits into this adjacent stringer, using a square make sure the stringers are 90° to each other. Now you are happy with how the tread fits we can secure it into place.
On a bottom winder If you are assembling the winder box before fitting the staircase you may find it easiest to fix the corner winder into the housing on loose stringer first of all as its difficult to drive a wedge in once this is fitted.
Glue the stringer tenon into the mortice slot, you can screw through the back of the upper stringer to hold this in place.
Using the same method as before, fix the final winder (and bullnose step) into place. The next step is fitting your risers.
Fitting a mid winder
When fitting a 3 tread winder to the middle of your flight, follow the below steps.
Step 1
Follow the newel post fitting guide and fix the newel post to the longer of the 2 stair runs (it doesn't matter if it’s the upper or lower run). Now locate the first winder step which follows on from the straight run of steps, slide the winder into the wall stringer and newel post housing until the nosing is fully forward within the housing, the winder should fit perfectly in the housing with the back of the tread in line with the above riser trenching. Do not trim or modify any treads, these are cut accurately on a CNC machine, if it doesn't fit you may have the tread in the wrong place. If you have a problem, please call us.
Once you are happy the winder fits into its housing, apply a bead of glue to the newel post housing and to one of the larger (approx. 300mm long) winder wedges and drive it into the trenching under the tread using a hammer, ensure the winder tread remains fully seated within the stringer housing (it may sit 1-2mm shy from the bottom of the newel post housing, you must ensure the newel post remains at 90° to the tread!). Next, use a screw to secure the newel post end of the winder tread, you will need to drill and pilot drill where appropriate.
Step 2
Slide the next winder (kite shaped) into the stringer (ensure you have the correct one as they will be different), ensure the tread lines up with the riser housing. Now dry fit the next staircase run into both the newel and string mortice slot to ensure the corner tread fits into this adjacent stringer, using a square make sure the stringers are 90° to each other. Now you are happy with how the tread fits we can secure it into place.
Glue both the newel post tenon and stringer tenon into their mortice slots, you can screw through the back of the upper stringer to hold this in place. Dowels will secure the stringer into the newel post.
Using the same method as before, fix the final winder into place. The next step is fitting your risers.
Fitting a 6 winder
When fitting a 6 tread winder to your flight, follow the below steps.
Step 1
Follow the newel post fitting guide and fix the newel post to the longer of the 2 stair runs (it doesn't matter if it's the upper or lower run). Now locate the first winder step which follows on from the straight run of steps, slide the winder into the wall stringer and newel post housing until the nosing is fully forward within the housing, the winder should fit perfectly in the housing with the back of the tread in line with the above riser trenching. Do not trim or modify any treads, these are cut accurately on a CNC machine, if it doesn't fit you may have the tread in the wrong place. If you have a problem, please call us.
Step 2
Should you have something in the way of your staircase as you ascend the flight, for example a wall part way up or even the edge of your stairwell, and your balustrade is running next to it we would suggest taking the total opening width and taking 50mm off this to get the width of your staircase. The reason for this is pretty simple, we do not want you to trap your fingers! The additional 50mm provides enough room for your hand to flow past without getting snagged on anything. The next step is fitting your risers.
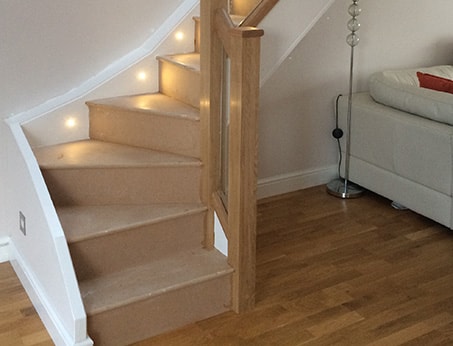
Fitting your risers
Once you've fitted the winder treads, follow step 3 below.
Step 1
This stage is very important, and if done correctly your staircase should be forever squeak free! Dry fit each riser around the newel posts, trimming where required. Be aware longer risers are for the kite winders.
Once you are happy the riser fits, run a small bead of glue (we recommend PU Adhesive) within the newel housing and along the back of the tread where the riser will be screwed. Beware not to over glue this joint, especially if the flight is not being carpeted as the glue can be difficult to remove from the face of your staircase - it’s best to run the bead of glue towards the under edge of the stair.
You are now ready to screw the riser to the tread, if your treads and risers are MDF we recommend 40mm screws, on timber 30mm should be ample to fix a 10mm riser. Use 3-4 screws in the pre-drilled holes, be careful not to overtighten or let the screws spin. If screwing into a hardwood tread you will need to drill a pilot hole approximately 2-3mm in diameter. You can also use 1-2 screws to secure the riser into the newel post housing.
The next step is to glue the angle blocks in place with generous amounts of glue, it is very important that these are fixed properly, and the glue is allowed to set before use.


